- A+
一.原理及架构
1.什么是mysql的主从复制?
指一台服务器充当主数据库服务器,另一台或多台服务器充当从数据库服务器,主服务器中的数据自动复制到从服务器之中。对于多级复制,数据库服务器即可充当主机,也可充当从机。MySQL主从复制的基础是主服务器对数据库修改记录二进制日志,从服务器通过主服务器的二进制日志自动执行更新。一句话表示就是,主数据库做什么,从数据库就跟着做什么。
2.mysql复制的类型
1)基于语句的复制 :主库把sql语句写入到bin log中,完成复制。
2)基于行数据的复制:主库把每一行数据变化的信息作为事件,写入到bin log,完成复制。
3)混合复制:上面两个结合体,默认用语句复制,出问题时候自动切换成行数据复制。
tip:和上面相对应的日志格式也有三种:STATEMENT,ROW,MIXED。
STATEMENT模式(SBR)
每一条会修改数据的sql语句会记录到binlog中。优点是并不需要记录每一条sql语句和每一行的数据变化,减少了binlog日志量,节约IO,提高性能。缺点是在某些情况下会导致master-slave中的数据不一致(如sleep()函数, lastinsertid(),以及user-defined functions(udf)等会出现问题)。
ROW模式(RBR)
不记录每条sql语句的上下文信息,仅需记录哪条数据被修改了,修改成什么样了。而且不会出现某些特定情况下的存储过程、或function、或trigger的调用和触发无法被正确复制的问题。缺点是会产生大量的日志,尤其是alter table的时候会让日志暴涨。
MIXED模式(MBR)
以上两种模式的混合使用,一般的复制使用STATEMENT模式保存binlog,对于STATEMENT模式无法复制的操作使用ROW模式保存binlog,MySQL会根据执行的SQL语句选择日志保存方式。
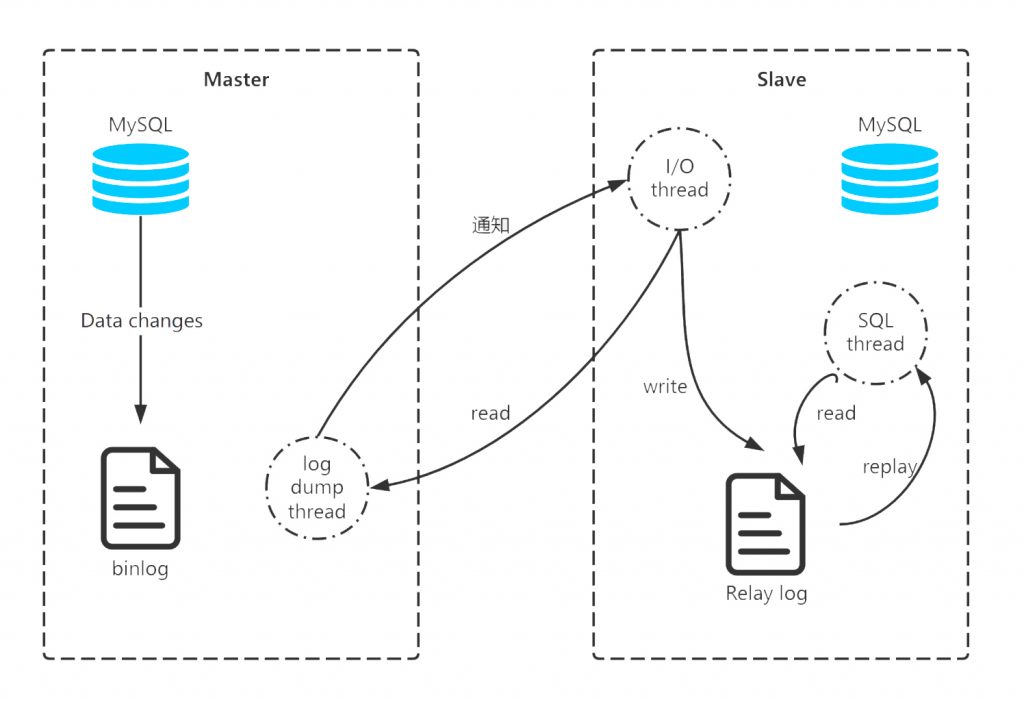
3.主从复制工作原理
1)Master 数据库只要发生变化,立马记录到Binary log 日志文件中。
2)Slave数据库启动一个I/O thread连接Master数据库,请求Master变化的二进制日志。
3)Slave I/O获取到的二进制日志,保存到自己的Relay log 日志文件中。
4)Slave 有一个 SQL thread定时检查Realy log是否变化,变化那么就更新数据。
4.主从复制的作用
1)实现服务器负载均衡
即可以通过在主服务器和从服务器之间切分处理客户查询的负荷,从而得到更好的客户相应时间。通常情况下,数据库管理员会有两种思路。
一是在主服务器上只实现数据的更新操作。包括数据记录的更新、删除、新建等等作业。而不关心数据的查询作业。数据库管理员将数据的查询请求全部 转发到从服务器中。这在某些应用中会比较有用。如某些应用,像基金净值预测的网站。其数据的更新都是有管理员更新的,即更新的用户比较少。而查询的用户数 量会非常的多。此时就可以设置一台主服务器,专门用来数据的更新。同时设置多台从服务器,用来负责用户信息的查询。
二是在主服务器上与从服务器切分查询的作业。在这种思路下,主服务器不单单要完成数据的更新、删除、插入等作业,同时也需要负担一部分查询作业。而从服务器的话,只负责数据的查询。当主服务器比较忙时,部分查询请求会自动发送到从服务器重,以降低主服务器的工作负荷。
2)通过复制实现数据的异地备份
可以定期的将数据从主服务器上复制到从服务器上,这无疑是先了数据的异地备份。在传统的备份体制下,是将数据备份在本地。此时备份作业与数据库服务器运行在同一台设备上,当备份作业运行时就会影响到服务器的正常运行。有时候会明显的降低服务器的性能。同时,将备份数据存放在本地,也 不是很安全。如硬盘因为电压等原因被损坏或者服务器被失窃,此时由于备份文件仍然存放在硬盘上,数据库管理员无法使用备份文件来恢复数据。这显然会给企业 带来比较大的损失。
3)提高数据库系统的可用性
数据库复制功能实现了主服务器与从服务器之间数据的同步,增加了数据库系统的可用性。当主服务器出现问题时,数据库管理员可以马上让从服务器作为主服务器,用来数据的更新与查询服务。然后回过头来再仔细的检查主服务器的问题。此时一般数据库管理员也会采用两种手段。
一是主服务器故障之后,虽然从服务器取代了主服务器的位置,但是对于主服务器可以采取的操作仍然做了一些限制。如仍然只能够进行数据的查询,而 不能够进行数据的更新、删除等操作。这主要是从数据的安全性考虑。如现在一些银行系统的升级,在升级的过程中,只能够查询余额而不能够取钱。这是同样的道理。
二是从服务器真正变成了主服务器。当从服务器切换为主服务器之后,其地位完全与原先的主服务器相同。此时可以实现对数据的查询、更新、删除等操 作。为此就需要做好数据的安全性工作。即数据的安全策略,要与原先的主服务器完全相同。否则的话,就可能会留下一定的安全隐患。
二.一主一从架构部署
地址规划:
IP地址分别为:192.168.250.191-192.168.250.192。
服务器操作系统:KVM虚拟机环境下虚拟机Centos7.8。
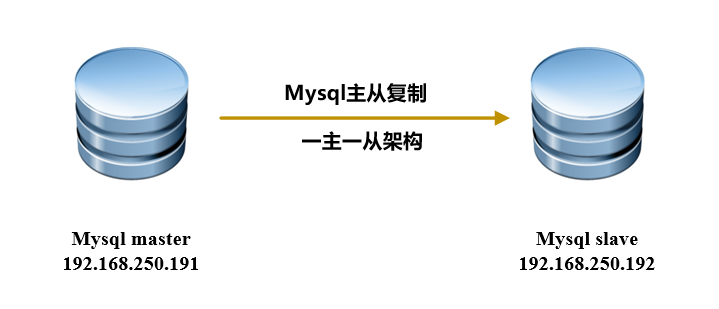
- mysql主:192.168.250.191
- mysql从:192.168.250.192
- [root@mysql01 ~]# cat /etc/redhat-release
- CentOS Linux release 7.8.2003 (Core)
- [root@mysql01 ~]#
- [root@mysql02 ~]# cat /etc/redhat-release
- CentOS Linux release 7.8.2003 (Core)
- [root@mysql02 ~]#
1.安装mysql5.7
下载并安装MySQL官方的 Yum Repository
- [root@mysql01 mydown]# wget -i -c http://dev.mysql.com/get/mysql57-community-release-el7-10.noarch.rpm
- --2022-02-21 16:57:31-- http://dev.mysql.com/get/mysql57-community-release-el7-10.noarch.rpm
- 正在解析主机 dev.mysql.com (dev.mysql.com)... 137.254.60.11
- 正在连接 dev.mysql.com (dev.mysql.com)|137.254.60.11|:80... 已连接。
- 已发出 HTTP 请求,正在等待回应... 301 Moved Permanently
- 位置:https://dev.mysql.com/get/mysql57-community-release-el7-10.noarch.rpm [跟随至新的 URL]
- --2022-02-21 16:57:37-- https://dev.mysql.com/get/mysql57-community-release-el7-10.noarch.rpm
- 正在连接 dev.mysql.com (dev.mysql.com)|137.254.60.11|:443... 已连接。
- 已发出 HTTP 请求,正在等待回应... 302 Found
- 位置:https://repo.mysql.com//mysql57-community-release-el7-10.noarch.rpm [跟随至新的 URL]
- --2022-02-21 16:57:41-- https://repo.mysql.com//mysql57-community-release-el7-10.noarch.rpm
- 正在解析主机 repo.mysql.com (repo.mysql.com)... 184.27.193.3
- 正在连接 repo.mysql.com (repo.mysql.com)|184.27.193.3|:443... 已连接。
- 已发出 HTTP 请求,正在等待回应... 200 OK
- 长度:25548 (25K) [application/x-redhat-package-manager]
- 正在保存至: “mysql57-community-release-el7-10.noarch.rpm”
- 100%[=======================================================================================================================================================================>] 25,548 --.-K/s 用时 0s
- 2022-02-21 16:57:48 (71.0 MB/s) - 已保存 “mysql57-community-release-el7-10.noarch.rpm” [25548/25548])
- -c: 没有那个文件或目录
- 在 -c 中找不到 URL。
- FINISHED --2022-02-21 16:57:48--
- Total wall clock time: 17s
- Downloaded: 1 files, 25K in 0s (71.0 MB/s)
- [root@mysql01 mydown]# ls
- mysql57-community-release-el7-10.noarch.rpm
- [root@mysql01 mydown]#
使用上面的命令就直接下载了安装用的Yum Repository,大概25KB的样子,然后就可以直接yum安装了。
- [root@mysql01 mydown]# yum -y install mysql57-community-release-el7-10.noarch.rpm
- 已加载插件:fastestmirror, langpacks
- 正在检查 mysql57-community-release-el7-10.noarch.rpm: mysql57-community-release-el7-10.noarch
- mysql57-community-release-el7-10.noarch.rpm 将被安装
- 正在解决依赖关系
- --> 正在检查事务
- ---> 软件包 mysql57-community-release.noarch.0.el7-10 将被 安装
- --> 解决依赖关系完成
- 依赖关系解决
- =================================================================================================================================================================================================================
- Package 架构 版本 源 大小
- =================================================================================================================================================================================================================
- 正在安装:
- mysql57-community-release noarch el7-10 /mysql57-community-release-el7-10.noarch 30 k
- 事务概要
- =================================================================================================================================================================================================================
- 安装 1 软件包
- 总计:30 k
- 安装大小:30 k
- Downloading packages:
- Running transaction check
- Running transaction test
- Transaction test succeeded
- Running transaction
- 正在安装 : mysql57-community-release-el7-10.noarch 1/1
- 验证中 : mysql57-community-release-el7-10.noarch 1/1
- 已安装:
- mysql57-community-release.noarch 0:el7-10
- 完毕!
- [root@mysql01 mydown]#
之后就开始安装MySQL服务器。
- [root@mysql01 mydown]# yum -y install mysql-community-server
- 已加载插件:fastestmirror, langpacks
- Loading mirror speeds from cached hostfile
- * base: mirrors.ustc.edu.cn
- * extras: mirrors.ustc.edu.cn
- * updates: mirrors.bfsu.edu.cn
- 正在解决依赖关系
- --> 正在检查事务
- ---> 软件包 mysql-community-server.x86_64.0.5.7.37-1.el7 将被 安装
- --> 正在处理依赖关系 mysql-community-common(x86-64) = 5.7.37-1.el7,它被软件包 mysql-community-server-5.7.37-1.el7.x86_64 需要
- --> 正在处理依赖关系 mysql-community-client(x86-64) >= 5.7.9,它被软件包 mysql-community-server-5.7.37-1.el7.x86_64 需要
- --> 正在检查事务
- ---> 软件包 mysql-community-client.x86_64.0.5.7.37-1.el7 将被 安装
- --> 正在处理依赖关系 mysql-community-libs(x86-64) >= 5.7.9,它被软件包 mysql-community-client-5.7.37-1.el7.x86_64 需要
- ---> 软件包 mysql-community-common.x86_64.0.5.7.37-1.el7 将被 安装
- --> 正在检查事务
- ---> 软件包 mariadb-libs.x86_64.1.5.5.65-1.el7 将被 取代
- --> 正在处理依赖关系 libmysqlclient.so.18()(64bit),它被软件包 2:postfix-2.10.1-9.el7.x86_64 需要
- --> 正在处理依赖关系 libmysqlclient.so.18(libmysqlclient_18)(64bit),它被软件包 2:postfix-2.10.1-9.el7.x86_64 需要
- ---> 软件包 mysql-community-libs.x86_64.0.5.7.37-1.el7 将被 舍弃
- --> 正在检查事务
- ---> 软件包 mysql-community-libs-compat.x86_64.0.5.7.37-1.el7 将被 舍弃
- --> 解决依赖关系完成
- 依赖关系解决
- =================================================================================================================================================================================================================
- Package 架构 版本 源 大小
- =================================================================================================================================================================================================================
- 正在安装:
- mysql-community-libs x86_64 5.7.37-1.el7 mysql57-community 2.4 M
- 替换 mariadb-libs.x86_64 1:5.5.65-1.el7
- mysql-community-libs-compat x86_64 5.7.37-1.el7 mysql57-community 1.2 M
- 替换 mariadb-libs.x86_64 1:5.5.65-1.el7
- mysql-community-server x86_64 5.7.37-1.el7 mysql57-community 174 M
- 为依赖而安装:
- mysql-community-client x86_64 5.7.37-1.el7 mysql57-community 25 M
- mysql-community-common x86_64 5.7.37-1.el7 mysql57-community 311 k
- 事务概要
- =================================================================================================================================================================================================================
- 安装 3 软件包 (+2 依赖软件包)
- 总下载量:203 M
- Downloading packages:
- 警告:/var/cache/yum/x86_64/7/mysql57-community/packages/mysql-community-common-5.7.37-1.el7.x86_64.rpm: 头V4 RSA/SHA256 Signature, 密钥 ID 3a79bd29: NOKEY ] 158 kB/s | 189 kB 00:21:52 ETA
- mysql-community-common-5.7.37-1.el7.x86_64.rpm 的公钥尚未安装
- (1/5): mysql-community-common-5.7.37-1.el7.x86_64.rpm | 311 kB 00:00:07
- (2/5): mysql-community-libs-5.7.37-1.el7.x86_64.rpm | 2.4 MB 00:00:02
- (3/5): mysql-community-libs-compat-5.7.37-1.el7.x86_64.rpm | 1.2 MB 00:00:01
- (4/5): mysql-community-client-5.7.37-1.el7.x86_64.rpm | 25 MB 00:00:25
- (5/5): mysql-community-server-5.7.37-1.el7.x86_64.rpm | 174 MB 00:00:52
- -----------------------------------------------------------------------------------------------------------------------------------------------------------------------------------------------------------------
- 总计 3.2 MB/s | 203 MB 00:01:03
- 从 file:///etc/pki/rpm-gpg/RPM-GPG-KEY-mysql 检索密钥
- 导入 GPG key 0x5072E1F5:
- 用户ID : "MySQL Release Engineering <mysql-build@oss.oracle.com>"
- 指纹 : a4a9 4068 76fc bd3c 4567 70c8 8c71 8d3b 5072 e1f5
- 软件包 : mysql57-community-release-el7-10.noarch (@/mysql57-community-release-el7-10.noarch)
- 来自 : /etc/pki/rpm-gpg/RPM-GPG-KEY-mysql
- mysql-community-libs-compat-5.7.37-1.el7.x86_64.rpm 的公钥尚未安装
- 失败的软件包是:mysql-community-libs-compat-5.7.37-1.el7.x86_64
- GPG 密钥配置为:file:///etc/pki/rpm-gpg/RPM-GPG-KEY-mysql
- [root@mysql01 mydown]#
上面安装过程中出错,出错解决办法:
- [root@mysql01 mydown]# gpg --export -a 3a79bd29 > 3a79bd29.asc
- gpg: 已创建目录‘/root/.gnupg’
- gpg: 新的配置文件‘/root/.gnupg/gpg.conf’已建立
- gpg: 警告:在‘/root/.gnupg/gpg.conf’里的选项于此次运行期间未被使用
- gpg: 钥匙环‘/root/.gnupg/secring.gpg’已建立
- gpg: 钥匙环‘/root/.gnupg/pubring.gpg’已建立
- gpg: 警告:没有导出任何东西
- [root@mysql01 mydown]# rpm --import 3a79bd29.asc
- 错误:3a79bd29.asc: import read failed(0).
- [root@mysql01 mydown]# rpm --import https://repo.mysql.com/RPM-GPG-KEY-mysql-2022
- [root@mysql01 mydown]#
重新安装,完成安装
- [root@mysql01 mydown]# yum -y install mysql-community-server
- 已加载插件:fastestmirror, langpacks
- Loading mirror speeds from cached hostfile
- * base: mirrors.ustc.edu.cn
- * extras: mirrors.ustc.edu.cn
- * updates: mirrors.bfsu.edu.cn
- 正在解决依赖关系
- --> 正在检查事务
- ---> 软件包 mysql-community-server.x86_64.0.5.7.37-1.el7 将被 安装
- --> 正在处理依赖关系 mysql-community-common(x86-64) = 5.7.37-1.el7,它被软件包 mysql-community-server-5.7.37-1.el7.x86_64 需要
- --> 正在处理依赖关系 mysql-community-client(x86-64) >= 5.7.9,它被软件包 mysql-community-server-5.7.37-1.el7.x86_64 需要
- --> 正在检查事务
- ---> 软件包 mysql-community-client.x86_64.0.5.7.37-1.el7 将被 安装
- --> 正在处理依赖关系 mysql-community-libs(x86-64) >= 5.7.9,它被软件包 mysql-community-client-5.7.37-1.el7.x86_64 需要
- ---> 软件包 mysql-community-common.x86_64.0.5.7.37-1.el7 将被 安装
- --> 正在检查事务
- ---> 软件包 mariadb-libs.x86_64.1.5.5.65-1.el7 将被 取代
- --> 正在处理依赖关系 libmysqlclient.so.18()(64bit),它被软件包 2:postfix-2.10.1-9.el7.x86_64 需要
- --> 正在处理依赖关系 libmysqlclient.so.18(libmysqlclient_18)(64bit),它被软件包 2:postfix-2.10.1-9.el7.x86_64 需要
- ---> 软件包 mysql-community-libs.x86_64.0.5.7.37-1.el7 将被 舍弃
- --> 正在检查事务
- ---> 软件包 mysql-community-libs-compat.x86_64.0.5.7.37-1.el7 将被 舍弃
- --> 解决依赖关系完成
- 依赖关系解决
- =================================================================================================================================================================================================================
- Package 架构 版本 源 大小
- =================================================================================================================================================================================================================
- 正在安装:
- mysql-community-libs x86_64 5.7.37-1.el7 mysql57-community 2.4 M
- 替换 mariadb-libs.x86_64 1:5.5.65-1.el7
- mysql-community-libs-compat x86_64 5.7.37-1.el7 mysql57-community 1.2 M
- 替换 mariadb-libs.x86_64 1:5.5.65-1.el7
- mysql-community-server x86_64 5.7.37-1.el7 mysql57-community 174 M
- 为依赖而安装:
- mysql-community-client x86_64 5.7.37-1.el7 mysql57-community 25 M
- mysql-community-common x86_64 5.7.37-1.el7 mysql57-community 311 k
- 事务概要
- =================================================================================================================================================================================================================
- 安装 3 软件包 (+2 依赖软件包)
- 总计:203 M
- Downloading packages:
- Running transaction check
- Running transaction test
- Transaction test succeeded
- Running transaction
- 正在安装 : mysql-community-common-5.7.37-1.el7.x86_64 1/6
- 正在安装 : mysql-community-libs-5.7.37-1.el7.x86_64 2/6
- 正在安装 : mysql-community-client-5.7.37-1.el7.x86_64 3/6
- 正在安装 : mysql-community-server-5.7.37-1.el7.x86_64 4/6
- 正在安装 : mysql-community-libs-compat-5.7.37-1.el7.x86_64 5/6
- 正在删除 : 1:mariadb-libs-5.5.65-1.el7.x86_64 6/6
- 验证中 : mysql-community-libs-compat-5.7.37-1.el7.x86_64 1/6
- 验证中 : mysql-community-common-5.7.37-1.el7.x86_64 2/6
- 验证中 : mysql-community-libs-5.7.37-1.el7.x86_64 3/6
- 验证中 : mysql-community-server-5.7.37-1.el7.x86_64 4/6
- 验证中 : mysql-community-client-5.7.37-1.el7.x86_64 5/6
- 验证中 : 1:mariadb-libs-5.5.65-1.el7.x86_64 6/6
- 已安装:
- mysql-community-libs.x86_64 0:5.7.37-1.el7 mysql-community-libs-compat.x86_64 0:5.7.37-1.el7 mysql-community-server.x86_64 0:5.7.37-1.el7
- 作为依赖被安装:
- mysql-community-client.x86_64 0:5.7.37-1.el7 mysql-community-common.x86_64 0:5.7.37-1.el7
- 替代:
- mariadb-libs.x86_64 1:5.5.65-1.el7
- 完毕!
- [root@mysql01 mydown]#
2.MySQL数据库设置
首先启动MySQL
- [root@mysql01 mydown]# systemctl start mysqld
- [root@mysql01 mydown]# systemctl status mysqld
- ● mysqld.service - MySQL Server
- Loaded: loaded (/usr/lib/systemd/system/mysqld.service; enabled; vendor preset: disabled)
- Active: active (running) since 一 2022-02-21 17:13:22 CST; 10s ago
- Docs: man:mysqld(8)
- http://dev.mysql.com/doc/refman/en/using-systemd.html
- Process: 5812 ExecStart=/usr/sbin/mysqld --daemonize --pid-file=/var/run/mysqld/mysqld.pid $MYSQLD_OPTS (code=exited, status=0/SUCCESS)
- Process: 5756 ExecStartPre=/usr/bin/mysqld_pre_systemd (code=exited, status=0/SUCCESS)
- Main PID: 5815 (mysqld)
- Tasks: 27
- CGroup: /system.slice/mysqld.service
- └─5815 /usr/sbin/mysqld --daemonize --pid-file=/var/run/mysqld/mysqld.pid
- 2月 21 17:13:07 mysql01 systemd[1]: Starting MySQL Server...
- 2月 21 17:13:22 mysql01 systemd[1]: Started MySQL Server.
- [root@mysql01 mydown]#
此时MySQL已经开始正常运行,不过要想进入MySQL还得先找出此时root用户的密码,通过如下命令可以在日志文件中找出密码:
- [root@mysql01 /]# grep "password" /var/log/mysqld.log
- 2022-02-21T09:13:13.559648Z 1 [Note] A temporary password is generated for root@localhost: :&Z(vJ(oW5_G
- [root@mysql01 /]#
如下命令进入数据库:
- [root@mysql01 /]# mysql -uroot -p
- Enter password: :&Z(vJ(oW5_G
- Welcome to the MySQL monitor. Commands end with ; or \g.
- Your MySQL connection id is 2
- Server version: 5.7.37
- Copyright (c) 2000, 2022, Oracle and/or its affiliates.
- Oracle is a registered trademark of Oracle Corporation and/or its
- affiliates. Other names may be trademarks of their respective
- owners.
- Type 'help;' or '\h' for help. Type '\c' to clear the current input statement.
- mysql>
输入初始密码,此时不能做任何事情,因为MySQL默认必须修改密码之后才能操作数据库:
- ALTER USER 'root'@'localhost' IDENTIFIED BY 'new password';
更改密码:
- Type 'help;' or '\h' for help. Type '\c' to clear the current input statement.
- mysql> ALTER USER 'root'@'localhost' IDENTIFIED BY 'SUccess192#';
- Query OK, 0 rows affected (0.00 sec)
- mysql> quit
- Bye
- [root@mysql01 /]#
此时还有一个问题,就是因为安装了Yum Repository,以后每次yum操作都会自动更新,需要把这个卸载掉:
- [root@mysql01 /]# yum -y remove mysql57-community-release-el7-10.noarch
- 已加载插件:fastestmirror, langpacks
- 正在解决依赖关系
- --> 正在检查事务
- ---> 软件包 mysql57-community-release.noarch.0.el7-10 将被 删除
- --> 解决依赖关系完成
- 依赖关系解决
- =================================================================================================================
- Package 架构 版本 源 大小
- =================================================================================================================
- 正在删除:
- mysql57-community-release noarch el7-10 @/mysql57-community-release-el7-10.noarch 30 k
- 事务概要
- =================================================================================================================
- 移除 1 软件包
- 安装大小:30 k
- Downloading packages:
- Running transaction check
- Running transaction test
- Transaction test succeeded
- Running transaction
- 正在删除 : mysql57-community-release-el7-10.noarch 1/1
- 验证中 : mysql57-community-release-el7-10.noarch 1/1
- 删除:
- mysql57-community-release.noarch 0:el7-10
- 完毕!
- [root@mysql01 /]#
操作完成上面的,现在还不能用可视化的客户端进行连接,需要我们进行授权:
- mysql> grant all on *.* to root@'%' identified by 'SUccess192#';
- Query OK, 0 rows affected, 1 warning (0.00 sec)
3.配置主数据库
1)修改my.cnf文件
配置 Master 以使用基于二进制日志文件位置的复制,必须启用二进制日志记录并建立唯一的服务器ID,否则则无法进行主从复制。
先停掉服务,并且备份配置文件
- [root@mysql01 ~]# systemctl stop mysqld
- [root@mysql01 ~]# cp /etc/my.cnf /etc/my.cnf.ori.20220224bak
- [root@mysql01 ~]#
开启binlog ,每台设置不同的 server-id
- [root@mysql01 ~]# vim /etc/my.cnf
- # log_bin
- log-bin=mysql-bin
- server-id=1
- #解释:server-id服务的唯一标识(主从之间都必须不同);log-bin启动二进制日志名称为mysql-bin
2)主库添加从库账户
进入master的数据库,为master创建复制用户
- [root@mysql01 ~]# mysql -u root -p
- Enter password:
- Welcome to the MySQL monitor. Commands end with ; or \g.
- Your MySQL connection id is 6
- Server version: 5.7.37-log MySQL Community Server (GPL)
- Copyright (c) 2000, 2022, Oracle and/or its affiliates.
- Oracle is a registered trademark of Oracle Corporation and/or its
- affiliates. Other names may be trademarks of their respective
- owners.
- Type 'help;' or '\h' for help. Type '\c' to clear the current input statement.
- mysql> CREATE USER moonrong IDENTIFIED BY 'SUccessto192#';
- Query OK, 0 rows affected (0.13 sec)
- mysql>
赋予该用户复制的权利
- mysql> grant replication slave on *.* to 'moonrong'@'192.168.250.192' identified by 'SUccessto192#';
- Query OK, 0 rows affected, 1 warning (0.07 sec)
- mysql> FLUSH PRIVILEGES;
- Query OK, 0 rows affected (0.05 sec)
- mysql>
3)查看主库的状态
- mysql> show master status;
- +------------------+----------+--------------+------------------+-------------------+
- | File | Position | Binlog_Do_DB | Binlog_Ignore_DB | Executed_Gtid_Set |
- +------------------+----------+--------------+------------------+-------------------+
- | mysql-bin.000001 | 856 | | | |
- +------------------+----------+--------------+------------------+-------------------+
- 1 row in set (0.00 sec)
- mysql>
4.配置从数据库
1)修改my.cnf文件
- # Remove leading # to turn on a very important data integrity option: logging
- # changes to the binary log between backups.
- # log_bin
- log-bin = mysql-bin
- server-id = 2
2)配置从库参数
配置复制的参数,Slave从库连接Master主库的配置
- mysql> CHANGE MASTER TO
- -> MASTER_HOST = '192.168.250.191',
- -> MASTER_USER = 'moonrong',
- -> MASTER_PASSWORD = 'SUccessto192#',
- -> MASTER_LOG_FILE='mysql-bin.000001',
- -> MASTER_LOG_POS=856;
- Query OK, 0 rows affected, 2 warnings (0.33 sec)
- mysql>
3)启动从库slave进程
- mysql> slave start;
- ERROR 1064 (42000): You have an error in your SQL syntax; check the manual that corresponds to your MySQL server version for the right syntax to use near 'slave start' at line 1
- mysql>
上面遇到错误,进行语法检查,修正。
- mysql> start slave;
- Query OK, 0 rows affected (0.05 sec)
- mysql>
4)查看复制状态
- mysql> show slave status\G;
- *************************** 1. row ***************************
- Slave_IO_State: Waiting for master to send event
- Master_Host: 192.168.250.191
- Master_User: moonrong
- Master_Port: 3306
- Connect_Retry: 60
- Master_Log_File: mysql-bin.000001
- Read_Master_Log_Pos: 856
- Relay_Log_File: mysql02-relay-bin.000002
- Relay_Log_Pos: 320
- Relay_Master_Log_File: mysql-bin.000001
- Slave_IO_Running: Yes
- Slave_SQL_Running: Yes
- Replicate_Do_DB:
- Replicate_Ignore_DB:
- Replicate_Do_Table:
- Replicate_Ignore_Table:
- Replicate_Wild_Do_Table:
- Replicate_Wild_Ignore_Table:
- Last_Errno: 0
- Last_Error:
- Skip_Counter: 0
- Exec_Master_Log_Pos: 856
- Relay_Log_Space: 529
- Until_Condition: None
- Until_Log_File:
- Until_Log_Pos: 0
- Master_SSL_Allowed: No
- Master_SSL_CA_File:
- Master_SSL_CA_Path:
- Master_SSL_Cert:
- Master_SSL_Cipher:
- Master_SSL_Key:
- Seconds_Behind_Master: 0
- Master_SSL_Verify_Server_Cert: No
- Last_IO_Errno: 0
- Last_IO_Error:
- Last_SQL_Errno: 0
- Last_SQL_Error:
- Replicate_Ignore_Server_Ids:
- Master_Server_Id: 1
- Master_UUID: 7e00d3b2-92f6-11ec-a46a-52540000ca77
- Master_Info_File: /var/lib/mysql/master.info
- SQL_Delay: 0
- SQL_Remaining_Delay: NULL
- Slave_SQL_Running_State: Slave has read all relay log; waiting for more updates
- Master_Retry_Count: 86400
- Master_Bind:
- Last_IO_Error_Timestamp:
- Last_SQL_Error_Timestamp:
- Master_SSL_Crl:
- Master_SSL_Crlpath:
- Retrieved_Gtid_Set:
- Executed_Gtid_Set:
- Auto_Position: 0
- Replicate_Rewrite_DB:
- Channel_Name:
- Master_TLS_Version:
- 1 row in set (0.00 sec)
- ERROR:
- No query specified
- mysql>
如果有 Slave_IO_Running:Yes和 Slave_SQL_Running:Yes,说明成功。
上面有错误提示,继续解决。是因为上面多加了一个分号。
- mysql> show slave status\G
- *************************** 1. row ***************************
- Slave_IO_State: Waiting for master to send event
- Master_Host: 192.168.250.191
- Master_User: moonrong
- Master_Port: 3306
- Connect_Retry: 60
- Master_Log_File: mysql-bin.000001
- Read_Master_Log_Pos: 856
- Relay_Log_File: mysql02-relay-bin.000002
- Relay_Log_Pos: 320
- Relay_Master_Log_File: mysql-bin.000001
- Slave_IO_Running: Yes
- Slave_SQL_Running: Yes
- Replicate_Do_DB:
- Replicate_Ignore_DB:
- Replicate_Do_Table:
- Replicate_Ignore_Table:
- Replicate_Wild_Do_Table:
- Replicate_Wild_Ignore_Table:
- Last_Errno: 0
- Last_Error:
- Skip_Counter: 0
- Exec_Master_Log_Pos: 856
- Relay_Log_Space: 529
- Until_Condition: None
- Until_Log_File:
- Until_Log_Pos: 0
- Master_SSL_Allowed: No
- Master_SSL_CA_File:
- Master_SSL_CA_Path:
- Master_SSL_Cert:
- Master_SSL_Cipher:
- Master_SSL_Key:
- Seconds_Behind_Master: 0
- Master_SSL_Verify_Server_Cert: No
- Last_IO_Errno: 0
- Last_IO_Error:
- Last_SQL_Errno: 0
- Last_SQL_Error:
- Replicate_Ignore_Server_Ids:
- Master_Server_Id: 1
- Master_UUID: 7e00d3b2-92f6-11ec-a46a-52540000ca77
- Master_Info_File: /var/lib/mysql/master.info
- SQL_Delay: 0
- SQL_Remaining_Delay: NULL
- Slave_SQL_Running_State: Slave has read all relay log; waiting for more updates
- Master_Retry_Count: 86400
- Master_Bind:
- Last_IO_Error_Timestamp:
- Last_SQL_Error_Timestamp:
- Master_SSL_Crl:
- Master_SSL_Crlpath:
- Retrieved_Gtid_Set:
- Executed_Gtid_Set:
- Auto_Position: 0
- Replicate_Rewrite_DB:
- Channel_Name:
- Master_TLS_Version:
- 1 row in set (0.00 sec)
- mysql>
5.同步测试
在主服务器上新建一个库 mytestdb,然后在从库上查看。
- mysql> create database mytestdb;
- Query OK, 1 row affected (0.12 sec)
- mysql> show databases;
- +--------------------+
- | Database |
- +--------------------+
- | information_schema |
- | mysql |
- | mytestdb |
- | performance_schema |
- | sys |
- +--------------------+
- 5 rows in set (0.00 sec)
- mysql>
同样,登录从库,查看,自动同步 mytestdb。
- mysql> show databases;
- +--------------------+
- | Database |
- +--------------------+
- | information_schema |
- | mysql |
- | mytestdb |
- | performance_schema |
- | sys |
- +--------------------+
- 5 rows in set (0.00 sec)
- mysql>