- A+
一.简介
1.NFS网络文件系统
NFS(Network File System)即网络文件系统。
它是Unix系统之间共享文件的一种协议。
它支持多个节点同时挂载以及并发写入。
它允许网络中的计算机之间通过网络共享资源。
将NFS主机分享的目录,挂载到本地客户端当中,本地NFS的客户端应用可以透明地读写位于远端NFS服务器上的文件,在客户端端看起来,就像访问本地文件一样。
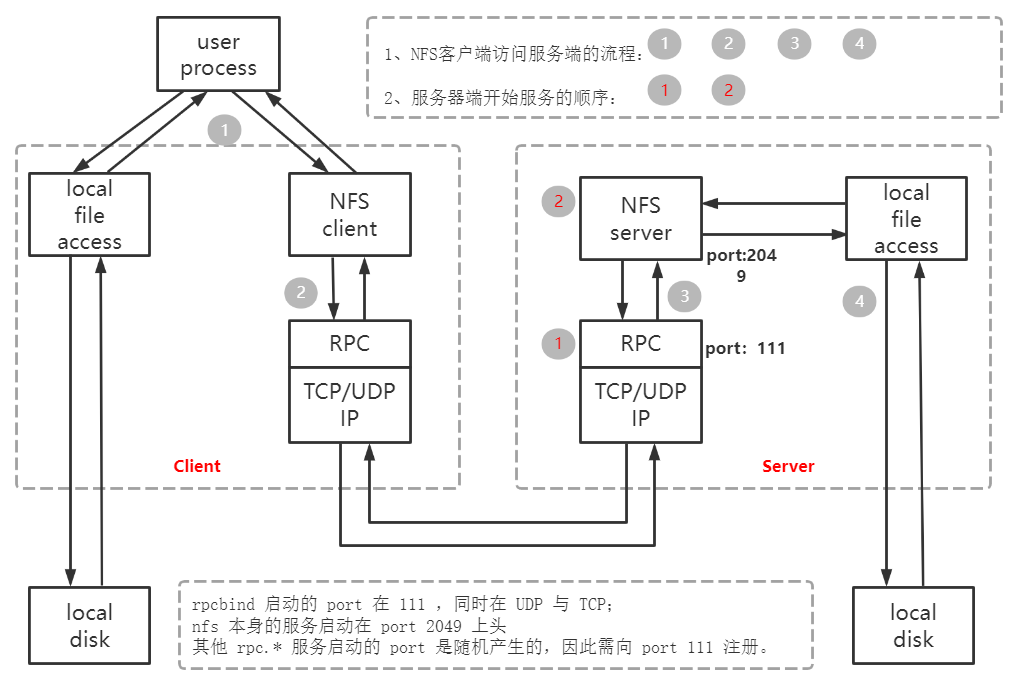
2.RPC远程过程调用
RPC,基于C/S模型。
程序可以使用这个协议请求网络中另一台计算机上某程序的服务而不需知道网络细节,甚至可以请求对方的系统调用。
对于Linux而言,文件系统是在内核空间实现的,即文件系统比如ext3、ext4等是在Kernel启动时,以内核模块的身份加载运行的。
二.原理
NFS本身的服务并没有提供数据传递的协议,而是通过使用RPC(远程过程调用 Remote Procedure Call)来实现。当NFS启动后,会随机的使用一些端口,NFS就会向RPC去注册这些端口。RPC就会记录下这些端口,RPC会开启111端口。通过client端和sever端端口的连接来进行数据的传输。在启动nfs之前,首先要确保rpc服务启动。
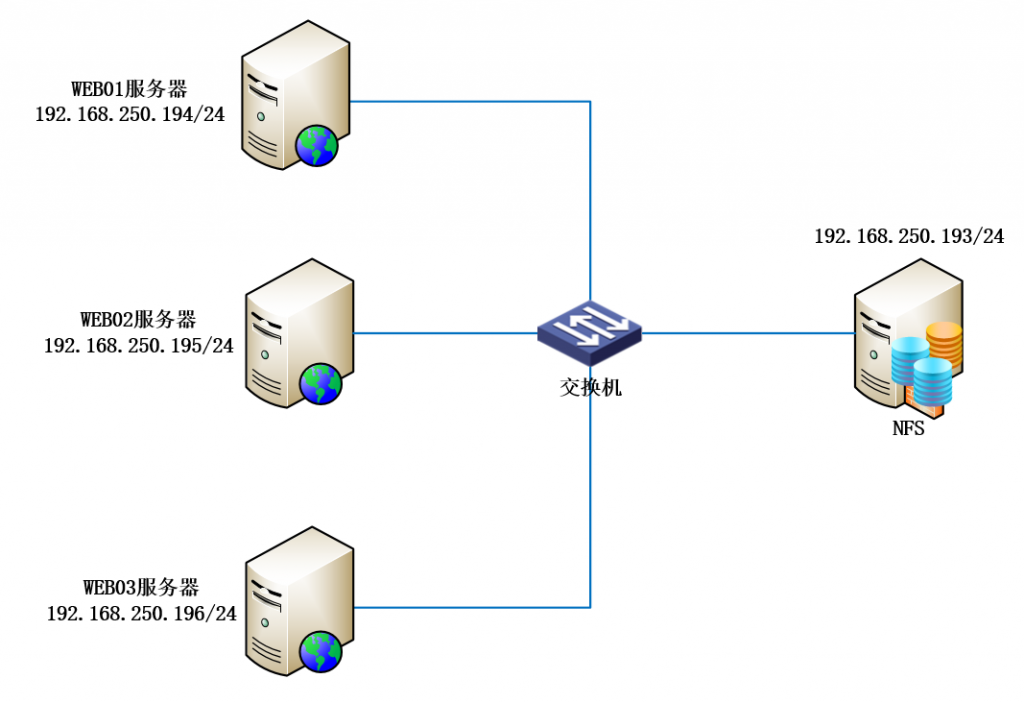
三.应用场景及规划信息
三台WEB服务器组成一个应用集群,后端通过一台NFS服务器作为NAS客户端,为前端应用服务器提供图片,视频存储。
基础规划信息:
- 操作系统:
- CentOS Linux release 7.8.2003 (Core)
- IP地址规划:
- NFS服务器(NAS服务器):192.168.250.193
- WEB服务器1(NFS客户端):192.168.250.194
- WEB服务器2(NFS客户端):192.168.250.195
- WEB服务器3(NFS客户端):192.168.250.196
四.NFS服务端安装与配置
1.安装NFS服务
- [root@mynfs01 ~]# yum install -y nfs-utils
- 已加载插件:fastestmirror, langpacks
- Loading mirror speeds from cached hostfile
- * base: mirrors.aliyun.com
- * extras: mirrors.aliyun.com
- * updates: mirrors.aliyun.com
- base | 3.6 kB 00:00:00
- extras | 2.9 kB 00:00:00
- updates | 2.9 kB 00:00:00
- (1/2): extras/7/x86_64/primary_db | 246 kB 00:00:00
- (2/2): updates/7/x86_64/primary_db | 14 MB 00:00:06
- 正在解决依赖关系
- --> 正在检查事务
- ---> 软件包 nfs-utils.x86_64.1.1.3.0-0.66.el7 将被 升级
- ---> 软件包 nfs-utils.x86_64.1.1.3.0-0.68.el7.2 将被 更新
- --> 解决依赖关系完成
- 依赖关系解决
- =====================================================================================================
- Package 架构 版本 源 大小
- =====================================================================================================
- 正在更新:
- nfs-utils x86_64 1:1.3.0-0.68.el7.2 updates 413 k
- 事务概要
- =====================================================================================================
- 升级 1 软件包
- 总下载量:413 k
- Downloading packages:
- No Presto metadata available for updates
- nfs-utils-1.3.0-0.68.el7.2.x86_64.rpm | 413 kB 00:00:05
- Running transaction check
- Running transaction test
- Transaction test succeeded
- Running transaction
- 正在更新 : 1:nfs-utils-1.3.0-0.68.el7.2.x86_64 1/2
- 清理 : 1:nfs-utils-1.3.0-0.66.el7.x86_64 2/2
- 验证中 : 1:nfs-utils-1.3.0-0.68.el7.2.x86_64 1/2
- 验证中 : 1:nfs-utils-1.3.0-0.66.el7.x86_64 2/2
- 更新完毕:
- nfs-utils.x86_64 1:1.3.0-0.68.el7.2
- 完毕!
- [root@mynfs01 ~]#
启动后查询状态
- [root@mynfs01 /]# systemctl status nfs-server
- ● nfs-server.service - NFS server and services
- Loaded: loaded (/usr/lib/systemd/system/nfs-server.service; disabled; vendor preset: disabled)
- Active: active (exited) since 六 2022-03-05 07:35:11 CST; 10min ago
- Process: 17212 ExecStartPost=/bin/sh -c if systemctl -q is-active gssproxy; then systemctl reload gssproxy ; fi (code=exited, status=0/SUCCESS)
- Process: 17196 ExecStart=/usr/sbin/rpc.nfsd $RPCNFSDARGS (code=exited, status=0/SUCCESS)
- Process: 17192 ExecStartPre=/usr/sbin/exportfs -r (code=exited, status=0/SUCCESS)
- Main PID: 17196 (code=exited, status=0/SUCCESS)
- Tasks: 0
- CGroup: /system.slice/nfs-server.service
- 3月 05 07:35:11 mynfs01 systemd[1]: Starting NFS server and services...
- 3月 05 07:35:11 mynfs01 systemd[1]: Started NFS server and services.
- [root@mynfs01 /]#
2.创建共享目录
- [root@mynfs01 /]# mkdir -p /mydata
- [root@mynfs01 /]# mkdir -p /mylogs
- [root@mynfs01 /]# mkdir -p /mytmp
- [root@mynfs01 /]#
3.编写配置文件
- [root@mynfs01 /]# vim /etc/exports
- [root@mynfs01 /]#
- /mytmp *(rw,sync,no_subtree_check,no_root_squash)
- /mydata *(rw,sync,no_subtree_check,no_root_squash)
- /mylogs *(rw,sync,no_subtree_check,no_root_squash)
- 注:上面*也可以指定具体的IP地址或子网
上面参数的作用:
- Rw:该主机对该共享目录有读写权限
- Sync:资料同步写入到内存与硬盘中
- no_subtree_check:和上面相对,不检查父目录权限
- No_root_squash:客户机用root访问该共享文件夹时,不映射root用户(不压制root,当client端使用root挂载时,也有root权限)
4.重启服务
- [root@mynfs01 /]# systemctl restart nfs-server
- [root@mynfs01 /]# systemctl enable nfs-server
- Created symlink from /etc/systemd/system/multi-user.target.wants/nfs-server.service to /usr/lib/systemd/system/nfs-server.service.
- [root@mynfs01 /]#
5.常用的查询命令工具
- 1)显示已经mount到本机nfs目录的客户端机器
- [root@mynfs01 /]# showmount -e localhost
- Export list for localhost:
- /mylogs *
- /mydata *
- /mytmp *
- [root@mynfs01 /]#
- 2)显示NFS文件系统信息
- [root@mynfs01 /]# exportfs -v
- /mytmp <world>(sync,wdelay,hide,no_subtree_check,sec=sys,rw,secure,no_root_squash,no_all_squash)
- /mydata <world>(sync,wdelay,hide,no_subtree_check,sec=sys,rw,secure,no_root_squash,no_all_squash)
- /mylogs <world>(sync,wdelay,hide,no_subtree_check,sec=sys,rw,secure,no_root_squash,no_all_squash)
- [root@mynfs01 /]#
- 3)查看NFS系统运行状态
- [root@mynfs01 mydata]# nfsstat
- Server rpc stats:
- calls badcalls badclnt badauth xdrcall
- 482 0 0 0 0
- Server nfs v4:
- null compound
- 1 0% 481 99%
- Server nfs v4 operations:
- op0-unused op1-unused op2-future access close commit
- 0 0% 0 0% 0 0% 6 0% 0 0% 0 0%
- create delegpurge delegreturn getattr getfh link
- 0 0% 0 0% 0 0% 70 10% 9 1% 0 0%
- lock lockt locku lookup lookup_root nverify
- 0 0% 0 0% 0 0% 6 0% 0 0% 0 0%
- open openattr open_conf open_dgrd putfh putpubfh
- 0 0% 0 0% 0 0% 0 0% 69 10% 0 0%
- putrootfh read readdir readlink remove rename
- 6 0% 0 0% 2 0% 0 0% 0 0% 0 0%
- renew restorefh savefh secinfo setattr setcltid
- 0 0% 0 0% 0 0% 0 0% 0 0% 0 0%
- setcltidconf verify write rellockowner bc_ctl bind_conn
- 0 0% 0 0% 0 0% 0 0% 0 0% 0 0%
- exchange_id create_ses destroy_ses free_stateid getdirdeleg getdevinfo
- 1 0% 1 0% 0 0% 0 0% 0 0% 0 0%
- getdevlist layoutcommit layoutget layoutreturn secinfononam sequence
- 0 0% 0 0% 0 0% 0 0% 3 0% 479 73%
- set_ssv test_stateid want_deleg destroy_clid reclaim_comp
- 0 0% 0 0% 0 0% 0 0% 1 0%
- [root@mynfs01 mydata]#
- 4)查看rpc执行信息,可以用于检测rpc运行情况
- [root@mynfs01 /]# rpcinfo | grep tcp
- 100000 4 tcp6 ::.0.111 portmapper superuser
- 100000 3 tcp6 ::.0.111 portmapper superuser
- 100000 4 tcp 0.0.0.0.0.111 portmapper superuser
- 100000 3 tcp 0.0.0.0.0.111 portmapper superuser
- 100000 2 tcp 0.0.0.0.0.111 portmapper superuser
- 100024 1 tcp 0.0.0.0.142.173 status 29
- 100024 1 tcp6 ::.208.214 status 29
- 100005 1 tcp 0.0.0.0.78.80 mountd superuser
- 100005 1 tcp6 ::.78.80 mountd superuser
- 100005 2 tcp 0.0.0.0.78.80 mountd superuser
- 100005 2 tcp6 ::.78.80 mountd superuser
- 100005 3 tcp 0.0.0.0.78.80 mountd superuser
- 100005 3 tcp6 ::.78.80 mountd superuser
- 100003 3 tcp 0.0.0.0.8.1 nfs superuser
- 100003 4 tcp 0.0.0.0.8.1 nfs superuser
- 100227 3 tcp 0.0.0.0.8.1 nfs_acl superuser
- 100003 3 tcp6 ::.8.1 nfs superuser
- 100003 4 tcp6 ::.8.1 nfs superuser
- 100227 3 tcp6 ::.8.1 nfs_acl superuser
- 100021 1 tcp 0.0.0.0.138.78 nlockmgr superuser
- 100021 3 tcp 0.0.0.0.138.78 nlockmgr superuser
- 100021 4 tcp 0.0.0.0.138.78 nlockmgr superuser
- 100021 1 tcp6 ::.132.54 nlockmgr superuser
- 100021 3 tcp6 ::.132.54 nlockmgr superuser
- 100021 4 tcp6 ::.132.54 nlockmgr superuser
- [root@mynfs01 /]#
- 5)查看网络端口
NFS默认是使用111端口
- [root@mynfs01 /]# netstat -anpl | grep 111
- tcp 0 0 0.0.0.0:111 0.0.0.0:* LISTEN 738/rpcbind
- tcp6 0 0 :::111 :::* LISTEN 738/rpcbind
- udp 0 0 0.0.0.0:111 0.0.0.0:* 738/rpcbind
- udp6 0 0 :::111 :::* 738/rpcbind
- unix 2 [ ] DGRAM 101110 1/systemd
- [root@mynfs01 /]#
五.客户端安装
1.安装客户端工具
- [root@mynfs02 ~]# yum -y install nfs-utils
- 已加载插件:fastestmirror, langpacks
- Loading mirror speeds from cached hostfile
- * base: mirrors.aliyun.com
- * extras: mirrors.aliyun.com
- * updates: mirrors.aliyun.com
- base | 3.6 kB 00:00:00
- extras | 2.9 kB 00:00:00
- updates | 2.9 kB 00:00:00
- (1/2): extras/7/x86_64/primary_db | 246 kB 00:00:06
- (2/2): updates/7/x86_64/primary_db | 14 MB 00:00:13
- 正在解决依赖关系
- --> 正在检查事务
- ---> 软件包 nfs-utils.x86_64.1.1.3.0-0.66.el7 将被 升级
- ---> 软件包 nfs-utils.x86_64.1.1.3.0-0.68.el7.2 将被 更新
- --> 解决依赖关系完成
2.查看NFS服务器上的共享目录
这里需要关闭NFS服务端的防火墙,或者开放rpc端口
- [root@mynfs02 ~]# showmount -e 192.168.250.193
- Export list for 192.168.250.193:
- /mylogs *
- /mydata *
- /mytmp *
- [root@mynfs02 ~]#
3.建立本地挂载目录
- [root@mynfs02 /]# mkdir -p {/mnt/mydata,/mnt/mylogs,/mnt/mytmp}
- [root@mynfs02 /]#
- [root@mynfs02 mnt]# ll
- 总用量 0
- drwxr-xr-x. 2 root root 6 3月 5 08:48 mydata
- drwxr-xr-x. 2 root root 6 3月 5 08:48 mylogs
- drwxr-xr-x. 2 root root 6 3月 5 08:49 mytmp
- [root@mynfs02 mnt]#
4.手动挂载共享目录
- [root@mynfs02 mnt]# mount -t nfs 192.168.250.193:/mydata /mnt/mydata
- [root@mynfs02 mnt]#
- [root@mynfs02 mnt]# mount -t nfs 192.168.250.193:/mylogs /mnt/mylogs
- [root@mynfs02 mnt]#
- [root@mynfs02 mnt]# mount -t nfs 192.168.250.193:/mytmp /mnt/mytmp
- [root@mynfs02 mnt]#
5.查看挂载
- [root@mynfs02 /]# df -Th
- 文件系统 类型 容量 已用 可用 已用% 挂载点
- devtmpfs devtmpfs 1.9G 0 1.9G 0% /dev
- tmpfs tmpfs 1.9G 0 1.9G 0% /dev/shm
- tmpfs tmpfs 1.9G 9.3M 1.9G 1% /run
- tmpfs tmpfs 1.9G 0 1.9G 0% /sys/fs/cgroup
- /dev/mapper/centos-root xfs 50G 4.1G 46G 9% /
- /dev/vda1 xfs 1014M 185M 830M 19% /boot
- /dev/mapper/centos-home xfs 42G 37M 42G 1% /home
- tmpfs tmpfs 379M 12K 379M 1% /run/user/42
- tmpfs tmpfs 379M 0 379M 0% /run/user/0
- 192.168.250.193:/mydata nfs4 50G 4.1G 46G 9% /mnt/mydata
- 192.168.250.193:/mylogs nfs4 50G 4.1G 46G 9% /mnt/mylogs
- 192.168.250.193:/mytmp nfs4 50G 4.1G 46G 9% /mnt/mytmp
- [root@mynfs02 /]#
六.测试
在浏览器上访问WEB站点进行测试,过程略。