- A+
1.获取镜像
获取镜像的命令: docker pull, 格式为:
- docker pull [选项] [Docker Registry 地址[:端口]/]仓库名[:标签]
Docker 镜像仓库地址: 地址的格式⼀般是 <域名/IP>[:端口号], 默认地址是 Docker Hub。仓库名: 这里的仓库名是两段式名称, 即 <用户名>/<软件名>。 对于 Docker Hub, 如果不给出用户名,则默认为 library, 也就是官方镜像。 比如:
- [root@localhost ~]# docker pull ubuntu:18.04
- 18.04: Pulling from library/ubuntu
- 5667fdb72017: Pull complete
- d83811f270d5: Pull complete
- ee671aafb583: Pull complete
- 7fc152dfb3a6: Pull complete
- Digest: sha256:b88f8848e9a1a4e4558ba7cfc4acc5879e1d0e7ac06401409062ad2627e6fb58
- Status: Downloaded newer image for ubuntu:18.04
- docker.io/library/ubuntu:18.04
- [root@localhost ~]#
上面的命令中没有给出 Docker 镜像仓库地址, 因此将会从 Docker Hub 获取镜像。 而镜像名称是ubuntu:18.04, 因此将会获取官方镜像 library/ubuntu 仓库中标签为 18.04 的镜像。 从下载过程中可以看到我们之前提及的分层存储的概念, 镜像是由多层存储所构成。下载也是一层层的去下载,并非单一文件。 下载过程中给出了每⼀层的 ID 的前12位。并且下载结束后, 给出该镜像完整的sha256 的摘要,以确保下载一致性。
2.运行一个容器
有了镜像后, 我们就能够以这个镜像为基础启动并运行一个容器。以上面的 ubuntu:18.04 为例, 如果打算启动里面的 bash 并且进行交互式操作的话,可以执行下面的命令。
- [root@localhost ~]# docker run -it --rm ubuntu:18.04 /bin/bash
- root@61937fd43ff4:/#
关于上面启动容器中的参数解释
- -it:这是两个参数, 一个是 -i: 交互式操作, 一个是 -t 终端。这里打算进入 bash 执行一些命令并查看返回结果, 因此我们需要交互式终端。
- --rm:这个参数是说容器退出后随之将其删除。 默认情况下,为了排障需求,退出的容器并不会立即删除,除非手动 docker rm。我们这⾥只是随便执行个命令,看看结果, 不需要排障和保留结果,因此使用 --rm 可以避免浪费空间。
- ubuntu:18.04: 这是指⽤ ubuntu:18.04 镜像为基础来启动容器。
- bash:放在镜像名后的是命令,这里希望有个交互式 Shell,因此用的是 bash。
进⼊容器后,可以在 Shell下操作,执行任何所需的命令。这里执行了 cat /etc/osrelease ,这是 Linux 常用的查看当前系统版本的命令,从返回的结果可以看到容器内是 Ubuntu18.04.4 LTS 系统。最后我们通过 exit 退出了这个容器。
- root@61937fd43ff4:/# cat /etc/os-release
- NAME="Ubuntu"
- VERSION="18.04.3 LTS (Bionic Beaver)"
- ID=ubuntu
- ID_LIKE=debian
- PRETTY_NAME="Ubuntu 18.04.3 LTS"
- VERSION_ID="18.04"
- HOME_URL="https://www.ubuntu.com/"
- SUPPORT_URL="https://help.ubuntu.com/"
- BUG_REPORT_URL="https://bugs.launchpad.net/ubuntu/"
- PRIVACY_POLICY_URL="https://www.ubuntu.com/legal/terms-and-policies/privacy-policy"
- VERSION_CODENAME=bionic
- UBUNTU_CODENAME=bionic
- root@61937fd43ff4:/# exit
- exit
- [root@localhost ~]#
3.列出镜像
以下两条命令都可以列出镜像
- [root@localhost ~]# docker images
- REPOSITORY TAG IMAGE ID CREATED SIZE
- ubuntu 18.04 2ca708c1c9cc 3 weeks ago 64.2MB
- [root@localhost ~]# docker image ls
- REPOSITORY TAG IMAGE ID CREATED SIZE
- ubuntu 18.04 2ca708c1c9cc 3 weeks ago 64.2MB
- [root@localhost ~]#
列表包含了仓库名、标签、镜像ID、创建时间以及所占用的空间。镜像 ID 则是镜像的唯一标识,一个镜像可以对应多个标签。
4.查看镜像大小
docker image ls 列表中的镜像体积总和并非是所有镜像实际硬盘消耗。由于 Docker 镜像是多层存储结构,并且可以继承、复用,因此不同镜像可能会因为使用相同的基础镜像,从而拥有共同的层。由于Docker 使用 Union FS ,相同的层只需要保存⼀份即可, 因此实际镜像硬盘占用空间很可能要比这个列表镜像大小的总和要小的多。
通过以下命令来便捷的查看镜像、容器、数据卷所占用的空间。
- [root@localhost ~]# docker system df
- TYPE TOTAL ACTIVE SIZE RECLAIMABLE
- Images 1 0 64.19MB 64.19MB (100%)
- Containers 0 0 0B 0B
- Local Volumes 0 0 0B 0B
- Build Cache 0 0 0B 0B
- [root@localhost ~]#
5.新建并启动一个容器
以下是两种启动方式,一个是直接输出,一个是交互模式
- [root@localhost ~]# docker run ubuntu:18.04 /bin/echo 'Hello world'
- Hello world
- [root@localhost ~]# docker run -t -i ubuntu:18.04 /bin/bash
- root@df1cbad16fa0:/#
当利用 docker run 来创建容器时, Docker 在后台运行的标准操作包括:检查本地是否存在指定的镜像, 不存在就从公有仓库下载利用镜像创建并启动⼀个容器分配一个文件系统, 并在只读的镜像层外面挂载一层可读写层从宿主主机配置的网桥接口中桥接一个虚拟接口到容器中去从地址池配置一个 ip 地址给容器执行用户指定的应用程序执行完毕后容器被终止。
6.启动已终止的容器
可以利用docker container start命令,直接将⼀个已经终止的容器启动运行。
容器的核心为所执行的应用程序,所需要的资源都是应⽤程序运行所必需的。可以在伪终端中利用 ps 或 top 来查看进程信息。
- root@4b9f410be78d:/# ps
- PID TTY TIME CMD
- 1 pts/0 00:00:00 bash
- 11 pts/0 00:00:00 ps
- root@4b9f410be78d:/#
容器中仅运行了指定的 bash 应用。这种特点使得 Docker对资源的利用率极高,是货真价实的轻量级虚拟化。
- [root@localhost ~]# docker container start 015bb37563d0
- 015bb37563d0
7.后台运行
更多的时候需要让docker在后台运行,可以通过-d参数来实现,输出结果可以用docker logs查看。
- [root@localhost ~]# docker run -d ubuntu:18.04 /bin/sh -c "while true; do echo hello world; sleep 1; done"
- 015bb37563d0f614e7529340ccc3e983612567c0fa0cd31d1e12c79e5fbd5f19
- [root@localhost ~]#
- [root@localhost ~]# docker container logs 015bb37563d0
- hello world
- hello world
- hello world
- hello world
也可以通过 docker container ls 命令来查看容器信息
- [root@localhost ~]# docker container ls
- CONTAINER ID IMAGE COMMAND CREATED STATUS PORTS NAMES
- 015bb37563d0 ubuntu:18.04 "/bin/sh -c 'while t…" 2 minutes ago Up 2 minutes beautiful_chandrasekhar
- [root@localhost ~]#
8.终止容器
可以使用 docker container stop 来终止一个运行中的容器。此外,当 Docker 容器中指定的应用终结时,容器也自动终止。
终止之前先查看一下运行的容器,-a参数可以不加,加上包括已经终止的容器。
- [root@localhost ~]# docker container ls -a
- CONTAINER ID IMAGE COMMAND CREATED STATUS PORTS NAMES
- 015bb37563d0 ubuntu:18.04 "/bin/sh -c 'while t…" 10 minutes ago Up 10 minutes beautiful_chandrasekhar
- f21f1b1d48ef ubuntu:18.04 "/bin/bash" 24 minutes ago Exited (127) 10 minutes ago jovial_kirch
- 4b9f410be78d ubuntu:18.04 "/bin/bash" 30 minutes ago Exited (127) 26 minutes ago condescending_cohen
- df1cbad16fa0 ubuntu:18.04 "/bin/bash" 36 minutes ago Exited (127) 33 minutes ago lucid_wu
- 42ff7cc6217a ubuntu:18.04 "/bin/echo 'Hello wo…" 36 minutes ago Exited (0) 36 minutes ago bold_goldberg
- [root@localhost ~]#
下面停掉第一个
- [root@localhost ~]# docker container stop 015bb37563d0
- 015bb37563d0
再次查看,显示已经终止。
- [root@localhost ~]# docker container ls -a
- CONTAINER ID IMAGE COMMAND CREATED STATUS PORTS NAMES
- 015bb37563d0 ubuntu:18.04 "/bin/sh -c 'while t…" 12 minutes ago Exited (137) 9 seconds ago beautiful_chandrasekhar
- f21f1b1d48ef ubuntu:18.04 "/bin/bash" 27 minutes ago Exited (127) 12 minutes ago jovial_kirch
- 4b9f410be78d ubuntu:18.04 "/bin/bash" 33 minutes ago Exited (127) 29 minutes ago condescending_cohen
- df1cbad16fa0 ubuntu:18.04 "/bin/bash" 38 minutes ago Exited (127) 35 minutes ago lucid_wu
- 42ff7cc6217a ubuntu:18.04 "/bin/echo 'Hello wo…" 38 minutes ago Exited (0) 38 minutes ago bold_goldberg
- [root@localhost ~]#
9.重新启动容器
- [root@localhost ~]# docker container restart 015bb37563d0
- 015bb37563d0
- [root@localhost ~]#
10.进入容器
用exec进入容器
在使用 -d 参数时,容器启动后会进入后台。某些时候需要进入容器进行操作: exec 命令 -i -t 参数。只用 -i 参数时,由于没有分配伪终端,界面没有我们熟悉的 Linux 命令提示符,但命令执行结果仍然可以返回。当 -i -t 参数⼀起使用时,则可以看到我们熟悉的 Linux 命令提示符。
- [root@localhost ~]# docker exec -it af5b bash
- root@af5bc6b5c270:/#
11.删除容器
可以使用 docker container rm 来删除一个处于终止状态的容器。
- [root@localhost ~]# docker container rm bold_goldberg
- bold_goldberg
- [root@localhost ~]#
12.清理所有终止状态的容器
- [root@localhost ~]# docker container prune
- WARNING! This will remove all stopped containers.
- Are you sure you want to continue? [y/N] y
- Deleted Containers:
- f21f1b1d48ef4d413ebe87eae510c890d4b25d7834dbefb46a926d64d2a07255
- 4b9f410be78d70329644516d95e43aa52f73900385944ad23b9b006b53a69ffb
- df1cbad16fa0886a8db46e74ab2af801cffc24ea4053dae596829e8412cbde68
- Total reclaimed space: 79B
- [root@localhost ~]# docker container ls
- CONTAINER ID IMAGE COMMAND CREATED STATUS PORTS NAMES
- af5bc6b5c270 ubuntu:18.04 "/bin/bash" 11 minutes ago Up 11 minutes dreamy_wing
- 015bb37563d0 ubuntu:18.04 "/bin/sh -c 'while t…" 29 minutes ago Up 12 minutes beautiful_chandrasekhar
- [root@localhost ~]# docker container ls -a
- CONTAINER ID IMAGE COMMAND CREATED STATUS PORTS NAMES
- af5bc6b5c270 ubuntu:18.04 "/bin/bash" 11 minutes ago Up 11 minutes dreamy_wing
13.删除本地镜像
其格式为:
- docker image rm [选项] <镜像1> [<镜像2> ...]
或者
- docker rmi 镜像名
或者用 ID、 镜像名、 摘要删除镜像 其中, <镜像> 可以是镜像短 ID、 镜像长 ID、 镜像名或者镜像摘要。 比如我们有这么一些镜像:
- [root@localhost ~]# docker image ls
- REPOSITORY TAG IMAGE ID CREATED SIZE
- ubuntu 18.04 2ca708c1c9cc 3 weeks ago 64.2MB
- [root@localhost ~]#
我们可以用镜像的完整ID,也称为长ID,来删除镜像。使用脚本的时候可能会用长 ID,但是人工输入就太累了,所以更多的时候是用 短ID 来删除镜像。docker image ls 默认列出的就已经是短 ID了,一般取前3个字符以上,只要足够区分于别的镜像就可以了。比如这里,如果我们要删除redis:alpine镜像,可以执行:
演示前,我们先拉取一个redis:alpine镜像
- [root@localhost ~]# docker pull redis:alpine
- alpine: Pulling from library/redis
- 9d48c3bd43c5: Pull complete
- 6bcae78f4e99: Pull complete
- 8cb2d2938e96: Pull complete
- f766c018f90a: Pull complete
- 4820560d234d: Pull complete
- f4869f14d10b: Pull complete
- Digest: sha256:d9ea76b14d4771c7cd0c199de603f3d9b1ea246c0cbaae02b86783e1c1dcc3d1
- Status: Downloaded newer image for redis:alpine
- docker.io/library/redis:alpine
- [root@localhost ~]#
这里有两个镜像
- [root@localhost ~]# docker image ls
- REPOSITORY TAG IMAGE ID CREATED SIZE
- redis alpine f9d774eafe0d 2 weeks ago 29.3MB
- ubuntu 18.04 2ca708c1c9cc 3 weeks ago 64.2MB
- [root@localhost ~]#
- [root@localhost ~]# docker image rm f9d
- Untagged: redis:alpine
- Untagged: redis@sha256:d9ea76b14d4771c7cd0c199de603f3d9b1ea246c0cbaae02b86783e1c1dcc3d1
- Deleted: sha256:f9d774eafe0d9aa813860e94490efffec6041d63a786133749974c15c055663e
- Deleted: sha256:b4aed0a4db4e7a86f18e27e159e8b306213e6ff536e24f777a69c6ccbddf7e5a
- Deleted: sha256:c695f66131bc61149d3d6039f45a4d3dc9603816f167003b6d882e32d77edb2c
- Deleted: sha256:f28b2eaf0ee0704e7d30259c0eb481e953b0f783a28adf80c3a5b85e5615257f
- Deleted: sha256:72a001c014d9026fcd59ef2ed2df7cd710170e720fdc820a97ec07f6c1f614a4
- Deleted: sha256:a5411661154fbe748bfc9458b08308721cfde8e8e4af99b45a8d25189fb059b2
- Deleted: sha256:03901b4a2ea88eeaad62dbe59b072b28b6efa00491962b8741081c5df50c65e0
- [root@localhost ~]#
这里只有一个镜像了
- [root@localhost ~]# docker image ls -a
- REPOSITORY TAG IMAGE ID CREATED SIZE
- ubuntu 18.04 2ca708c1c9cc 3 weeks ago 64.2MB
- [root@localhost ~]#
也可以用镜像名, 也就是 <仓库名>:<标签>, 来删除镜像。
14.定制镜像
镜像是容器的基础,每次执行 docker run的时候都会指定哪个镜像作为容器运行的基础。
当dockerhub上的镜像无法直接满足需求时, 就需要定制这些镜像 。
下面以构建WEB服务器为例
- [root@localhost ~]# docker run --name webserver -d -p 80:80 nginx
- Unable to find image 'nginx:latest' locally
- latest: Pulling from library/nginx
- b8f262c62ec6: Pull complete
- e9218e8f93b1: Pull complete
- 7acba7289aa3: Pull complete
- Digest: sha256:aeded0f2a861747f43a01cf1018cf9efe2bdd02afd57d2b11fcc7fcadc16ccd1
- Status: Downloaded newer image for nginx:latest
- 0ef015f353a3a7212f220e46d457a8587f3f4d5efbf112ff571298d2f71a51e8
- [root@localhost ~]#
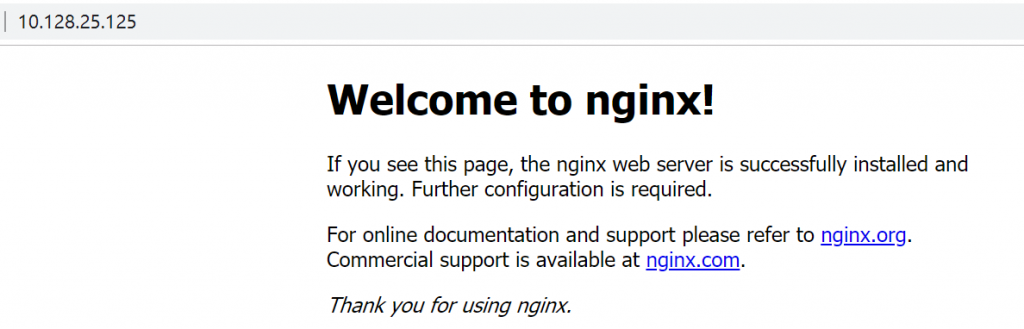
上面的命令会用nginx 镜像启动⼀个容器,命名为webserver,并且映射了80端口。
访问如下:
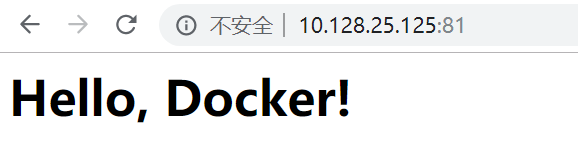
进入容器,对WEB页面进行修改
- [root@localhost ~]# docker exec -it webserver bash
- root@0ef015f353a3:/#
- root@0ef015f353a3:/# echo '<h1>Hello, Docker!</h1>' > /usr/share/nginx/html/index.html
- root@0ef015f353a3:/# exit
- exit
- [root@localhost ~]#
刷新页面

可以用下列命令查看具体的改动
- [root@localhost ~]# docker diff webserver
- C /root
- A /root/.bash_history
- C /run
- A /run/nginx.pid
- C /usr
- C /usr/share
- C /usr/share/nginx
- C /usr/share/nginx/html
- C /usr/share/nginx/html/index.html
- C /var
- C /var/cache
- C /var/cache/nginx
- A /var/cache/nginx/scgi_temp
- A /var/cache/nginx/uwsgi_temp
- A /var/cache/nginx/client_temp
- A /var/cache/nginx/fastcgi_temp
- A /var/cache/nginx/proxy_temp
- [root@localhost ~]#
将新修改的容器保存为镜像
- [root@localhost ~]# docker commit --author "好派笔记" --message "修改了默认首页" webserver nginx:v2
- sha256:19ed8f9542bf8b81d895b2d51889377e4022886ab74e1a7008d929d8f566ad92
- [root@localhost ~]#
接着查看新的镜像
- [root@localhost ~]# docker image ls
- REPOSITORY TAG IMAGE ID CREATED SIZE
- nginx v2 19ed8f9542bf 58 seconds ago 126MB
- nginx latest f949e7d76d63 2 weeks ago 126MB
- ubuntu 18.04 2ca708c1c9cc 3 weeks ago 64.2MB
- [root@localhost ~]#
查看镜像的变化
- [root@localhost ~]# docker history nginx:v2
- IMAGE CREATED CREATED BY SIZE COMMENT
- 19ed8f9542bf 2 minutes ago nginx -g daemon off; 164B 修改了默认首页
- f949e7d76d63 2 weeks ago /bin/sh -c #(nop) CMD ["nginx" "-g" "daemon… 0B
- <missing> 2 weeks ago /bin/sh -c #(nop) STOPSIGNAL SIGTERM 0B
- <missing> 2 weeks ago /bin/sh -c #(nop) EXPOSE 80 0B
- <missing> 2 weeks ago /bin/sh -c ln -sf /dev/stdout /var/log/nginx… 22B
- <missing> 2 weeks ago /bin/sh -c set -x && addgroup --system -… 56.8MB
- <missing> 2 weeks ago /bin/sh -c #(nop) ENV PKG_RELEASE=1~buster 0B
- <missing> 2 weeks ago /bin/sh -c #(nop) ENV NJS_VERSION=0.3.5 0B
- <missing> 2 weeks ago /bin/sh -c #(nop) ENV NGINX_VERSION=1.17.4 0B
- <missing> 4 weeks ago /bin/sh -c #(nop) LABEL maintainer=NGINX Do… 0B
- <missing> 4 weeks ago /bin/sh -c #(nop) CMD ["bash"] 0B
- <missing> 4 weeks ago /bin/sh -c #(nop) ADD file:1901172d265456090… 69.2MB
- [root@localhost ~]#
最后运行这个镜像,指定端口为81
- [root@localhost ~]# docker run --name webserv2 -d -p 81:80 nginx:v2
- 9f62e6e44b718a7e56281bfd4fb31fd365a5269e1dff889d18e1a447ec48a8b6
- [root@localhost ~]#
最后总结:
不要使用docker commit 定制镜像, 定制镜像应该使用 Dockerfile 来完成 。